Sunday, August 3, 2025

What’s in My Electronics Travel Bag (2025 Edition)

Whether I’m bouncing between Baltic capitals or off the grid in East Africa, staying connected, charged, and organized is critical. I’ve refined my tech travel kit over years of trial and error, and this post breaks down exactly what I carry and why. Below is a look inside my electronics bag — thoughtfully curated for performance, versatility, and airline compliance.

🔌 The Bag That Holds It All

BAGSMART Electronics Organizer Travel Case
This zippered pouch keeps the small pieces in place while the elastic holders keep all my cables, chargers, and adapters neatly arranged and accessible. It’s compact enough to slip into my backpack but holds more than you'd think. A must-have for every tech-forward traveler.


⚙️ Adapters & Cables

QianLink USB-C Female to USB Male Adapters (2-pack)
Perfect for connecting newer USB-C cables to older USB-A ports. Small, reliable, and invaluable in hotels or airports with legacy outlets.

Apple USB-C to USB Adapter
Apple’s version — pricier, but always dependable when I need stable performance with my MacBook Air.

⚡ Charging Essentials

4-Port USB Wall Charger
I use a compact international-compatible charger that powers multiple devices at once.

Apple Watch Magnetic Fast Charger (USB-C)
Small, durable, and essential for my Apple Watch Series 8. Charges fast via USB-C.

Anker 325 Power Bank (PowerCore 20K)
Massive 20,000mAh capacity keeps my phone, iPad, or even GoPro juiced up for days.
💡 Note: Be aware of airline restrictions — most allow under 100Wh, and this one clocks in just under.

SanDisk MobileMate USB 3.0 microSD Card Reader
Transfers GoPro footage to my MacBook quickly, no software needed.

Apple 30W USB-C Power Adapter
Lightweight and powerful — charges MacBook Air with ease.

AINOPE USB-C Cable
Fast-charging, braided for durability, and long enough to reach those awkward hotel outlets.

Other cables I always pack:

  • USB-A to microUSB
  • USB-A to USB-C
  • USB-A to Lightning
  • USB-C to Lightning

📱 Electronics I Travel With

iPhone 14 Pro
Excellent camera, long battery life, and MagSafe compatibility — my essential daily device.

M1 MacBook Air
Light, powerful, and silent. Perfect for editing photos, writing code, or booking last-minute flights.

Laptop Sleeve Case
Protects the MacBook from TSA bins and turbulent transit.

iPad 7th Gen
Used mainly for reading, journaling, or inflight entertainment. Still going strong.

GoPro HERO10 Black
My adventure cam — great for water, action, and compact vlogging.

AirPods Pro 2
Great noise cancellation and transparency mode. Perfect for both plane rides and walking tours.

Sony WH-1000XM4
Still the gold standard in over-ear noise cancelling. Incredible for long-haul flights.

Apple AirTags
One lives in my backpack, one in my carry-on, and another in my checked bag (if I'm checking). Lifesavers for any travel anxiety.

Apple Watch Series 8
Great for fitness tracking, contactless payments, and staying hands-free on the move.

🧠 Final Thoughts

This kit has kept me powered and productive across continents. It’s lean but complete — and most of it fits in one organizer pouch. If you’re building your own tech travel setup, hopefully this gives you a helpful starting point.

Got questions or want to share what’s in your bag? Drop a comment below.

Happy travels and smooth charging!

Wednesday, December 15, 2021

Perfect Finishing Touch on KDE

My favorite finishing touch to get KDE "Just Right" is to set the Application Launcher icon to match the icon of the operating system that is running (which of course is FreeBSD).  The first thing to do is obtain the image we want to use.  A nice set of icons to use can be found at: https://store.kde.org/p/1120013/

Double click the downloaded file to open with Ark or from the command line, expand with something like:

# gzcat 112422-freebsd_kde4menu.tar.gz | tar -xvf -

Next, simply right click on the Application Launcher and choose Configure Application Launcher...


From the Application Launcher Settings screen, click the icon and select Choose... 


Browse to the location where you extracted the icons.  On a 1920x1080 screen, the 42x42 icon is about the right size.  


Select Apply and OK and there we have it!


Saturday, December 11, 2021

Installing OpenBSD in bhyve on TrueNAS Core

Installing the BSDs

The bhyve functionality in TrueNAS Core provides a simple interface for creating virtual machines.  FreeBSD works very smoothly (as may be expected since bhyve was originally written for FreeBSD).  Creating virtual machines for the other members of the BSD family is slightly less straightforward.  There exist good resources for getting NetBSD installed (9.x here, and you can make that work with 8.x by following this).

OpenBSD

There are a couple of older resources to get OpenBSD installed on a TrueNAS Core virtual machine.  But they seem either out of date or somewhat more complicated than I found necessary.

Preparing the Disk

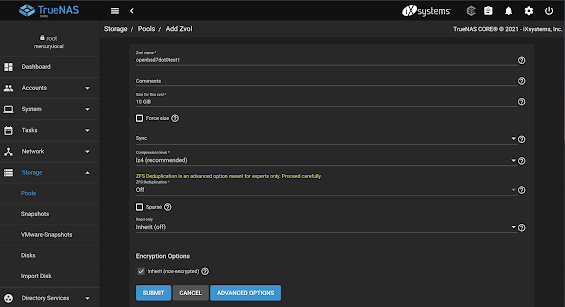
We can't install the OpenBSD operating directly on a virtual disk created by the VM Wizard.  So, we need to manually create a zvol to use.  In the TrueNAS interface, go to Storage > Pools and browse to the location where the rest of your virtual machine zvols are.  Click the three-dot menu on the right of the filesystem and select Add Zvol.  Give the new zvol a name and a size.  Defaults are fine choices for everything else.

Add Zvol

The next thing we need to do is dd the minirootXY.img file to the newly created zvol.  These are readily available for download for each release from the OpenBSD website here.  You can download manually, or simply use fetch:

# fetch https://cdn.openbsd.org/pub/OpenBSD/7.0/amd64/miniroot70.img

Next, we use dd to write that to the zvol we created above:

# dd if=/mnt/tank/files-local/OS_Images/OpenBSD/amd64/7.0/miniroot70.img of=/dev/zvol/tank/virtual-machines/openbsd7dot0test1 bs=1m 


Creating the Virtual Machine

Now that we have manually created the disk, the rest of the installation process is fairly standard (although, console-based).

You can create a virtual machine using the Wizard.  Most default options are fine.  On Step 1 Operating System, we can unselect Enable VNC since we need to do a text-based install from the console.  On Step 3 Disks, we need to choose Use existing disk image and set Select Disk Type to VirtIO.  Now, under Select Existing zvol, we choose the zvol we created above.


Set Adapter Type on Network Interfaces to VirtIO as well.  Leave the Installation Media blank since we already have in place what we need to boot (the result from dd above).  And then on Confirm Options, click Submit.

Booting the Installation

Now, we can start the virtual machine.  Expand the details and click Start.  Once the button is available, click on Serial.  From here, we need to get the output on our serial connection.  At the boot> prompt, issue the command: set tty com0

We should be back to the boot> prompt now.  Simply issue the command: boot


Installation

From here, we can do a pretty standard installation of OpenBSD.  After selecting the root disk, we do need to manually edit the bootable partition.  We use (E)dit and then edit 3 to edit the bootable partition.


Leave the defaults until we get to partition size.  By default, we get a pretty small partition.  The size you choose here depends on the size of the zvol you created earlier.  It's easy enough to just use the max size here.


Once that's set, we type quit and then use the auto layout (or custom if you so desire).  From here, all the defaults are fine.  Since the filesets didn't come with the img we downloaded, we'll need to specify the HTTP Server to get them from.  If it's not pre-populated, you can use cdn.openbsd.org

Once all filesets have been installed, we can then reboot.

Validating

At this point, we should have a functioning OpenBSD installation that we can access via ssh!


What’s in My Electronics Travel Bag (2025 Edition)

Whether I’m bouncing between Baltic capitals or off the grid in East Africa, staying connected, charged, and organized is critical. I’ve ref...